Tuesday, November 10, 2009

Canon Photo 5 Competition Finalists

That's right, another year and the Canon Photo 5 competition finalists list is woefully short of a me. However, what it's NOT short on is some absolutely fantastic talent! You can check out all the finalists here, but here are a couple of my choice picks. As this is a positive blog in general, I won't be featuring the ones I looked at and went "What the?? How did THAT beat me?" :-)

As I may have mentioned before, there were five briefs in this year's comp. The first one was close-ups of 100s and 1000s. Here is my favourite, the creepy Sprinkle Face by danielh:


The second brief was to capture an opaque liquid in motion. I never got around to shooting an image for this brief, though I had some cool ideas. This image is It Came From Above by ezzz:


Mostly I just love that the liquid is basically green slime and that it appears to start out of mid-air. Awesome :-)

The next brief was something called a Bokeh experiment. It makes lights appear as little stars. I couldn't make it work with my all-in-one camera though I'm not sure why. This is definitely something I will continue to experiment with in the future. Allyeska, the creator of this image, obviously figured it out better than I did:


Penultimately, there was the fantastic brief of a portrait of someone where somewhere in the image a pair of really cheesy black glasses had to appear. I am just in absolute awe of this Black, White and Read All Over by Bloto:


I mean, the reading theme was used in a lot of the entries, but this shot is just astounding. If it doesn't win it's category I will run rioting in the streets and set fire to some expensive luxury cars, all in the name of art.

And the fifth category was open this year to all and sundry and the theme was nearly black and very low-light photography. I actually had a hard time picking a favourite from this category as small imperfections in each image ruined it a little for me. Overall, the one that stuck with me that most and that I kept wanting to go back and look at again was She's Watching She by WillSpill:


I love the perspective and the atmosphere. I know the slight blurring around the face was unavoidable, and perhaps even intentional, but for me it's a detraction.

So, that's this year! I'll be interested to find out who actually wins, and I'm very much looking forward to competing again next year. I find it one of the best competitions in terms of taxing your creativity.

And don't forget to vote if you want someone to actually win!
Saturday, November 7, 2009

How to get a Treasury Main on Etsy - The Treasury Hunt

It's finally happened! My very first Etsy Treasury Main!

It's crazy, when I first started on Etsy I had no real idea how to get a Treasury. I would show up and there would either be 800 treasuries or there would be 334, I'd keep refreshing to make sure I didn't miss the change and then suddenly there'd be 800 again! It was very, very frustrating. So, for Etsy newcomers and others who just enjoy hearing the sound of my writing voice, here are some tips to getting a Treasury on Etsy:

1) How do I know when??

I don't know how people used to do it, probably by judging the position of the moon at the equinox or something, but Craftopolis has taken all (well, most) of the hard work out of figuring out when your best shot of getting a Treasury is. Just go to www.craftopolis.com and click on "Treasury Clock". It should be just to the right of the "Treasure Hunt" tab. This will tell you approximately when you should be heading over to Etsy to stake out your claim. When the needle hits the red, click on the timer and it will take you straight to the Treasury or Treasury West page!

A word of warning, this site does need some sort of flash player, so if you have an old school system you may not be able to use that aspect of the site.

2) Okay, now what?

So now you're on the Etsy Treasury page. The numbers say 334 or 336 or something like that. Just sit there and watch. This may take some time, so I recommend a crossword puzzle book. You'll need something you can focus on for short periods of time while continuously checking the numbers. There is a countdown timer but they can be inaccurate, especially when there are a lot of people on the site as there usually are when a Treasury is about to open up.

This is very important - Do Not Refresh or Reload! The Treasuries update automatically and you do not need to refresh. In fact, if you do you are far more likely to miss out. I live in Australia, so when I'm Treasury Hunting, I shut down all unessential internet applications to leave the line as free as possible. I don't know if that makes any different, but at least I feel like it does ^_^

3) How will I know when the Treasuries are open?

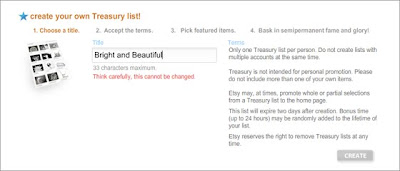
There will be no warning. The notice that the Treasury is full will just be replaced with this:


(Image from the Storque - they have a very interesting article on treasuries here)

Then all you need to do is type in your title and press create and congratulations, you have a treasury!

Note at this point that you cannot just create a Treasury and fill a title in later. It is an extremely good idea to have some idea of what your theme will be in advance so that you can very quickly type a title.

4) So - that's it?

Not quite. Then you will be faced with a screen that will ask you to put in all the items that you would like to display in your Treasury. As you will have already had a theme in mind (see above) it's likely that you will know what kind of images you want. If you want to be really organised, Etsy provide this excellent Treasury preparation tool which lets you put in items as practice and see how they look. It's fun to play around with even if you don't have a Treasury Hunt in mind.

I hope this helps some people avoid the frustrations and obstacles I struggled with when I joined Etsy! As I say, I now am the joyful owner of my very own Treasury Main.

Happy Hunting All!

Friday, November 6, 2009

PSPX2 Photo Editing How To and Competition!

Paint Shop Pro X2 has some very simple to use tools that can really enhance your photos and even change the entire feel of them. I think a lot of people try and stick to the simple stuff purely because they don't know what some of the other buttons do. A couple of my favourites are found in the makeover tools. They can be incredibly handy.

Another under-utilised tool can be found under Adjust - Brightness and Contrast - Clarify. Clarify, according to the Corel help section, is "to enhance depth and clarity". Basically what it seems to do is both brighten and sharpen the image simultaneously. Not much is needed and a very low setting (even 1.3 or 1.7) can provide a very satisfying result. The advantage of using this setting seems to be that you don't get the over-pixelisation you can get with the sharpen tool. I would still recommend using the Brightness and Contrast tool after this, just to make sure your image is exactly how you want it.

COMPETITION TIME!

My dear friend has let me take photos of her for my portrait portfolio. Beneath are two images, one as shot and one enhanced. Pick out one of the differences between the two images, throw it in a comment and you're in the draw to win an 8 x 12 inch print of your choice from my store! Looking at the bigger images will definitely give you an advantage in finding things others won't.


Happy hunting and I look forward to picking a winner just before the Sneak Attack on Tuesday, US Time.

Tuesday, October 27, 2009

My New Listing - Earth Saved 8 x 12 inch digital art print

Inspired by the wonderful photo collages of last week's Wednesday Heart, Imagine Studios, I sat down and had a bit of a play around last night and came up with this:


A giant, shadowy man emerges from a smouldering, smokey volcano to save the world from an evil swan monster. It must be true, it was in the paper.

Wednesday, October 21, 2009

The Wednesday Heart - Imagine Studio

The other day I mentioned briefly the concept of images that were in the public domain. As a funny coincidence the person who jumped to my attention as today's Wednesday Heart uses public domain images to create awesome photo fusion collages. I absolutely adore this type of digital art and Imagine Studio practices this artform to an extremely high level.

You all know what a big fan I am of fractals and photographic patterns, so it was a pretty sure bet that I was going to love this wonderful picture of a naked woman with a swirling blue pattern covering her body:


I love the romantic feel that hearkens back to the legends of Arthur and the poetry of the early Regency period. The blue circles echo down to the water beneath her form and it gives the whole piece a dream like resonance.

A common theme through most of the images created by Imagine Studio is that they focus a lot on women and have overtones of celebration and sexuality. This next print is a very clear illustration of the theme:


The sensuality comes through in the full lips and the darkened eyes, the mystery in the veil of shining colours across her face. The curves of hue beneath the eyes and upwards from the corners of the eyes enhance the feeling of a veil and give the image an exotic feel. I love this picture.

The exotic and the foreign is another theme that carries across the body of work. This picture is stunningly beautiful and evokes a Japanese feel:


It also reminds me of the work of some of the more fantastic body painters around. I'll do a completely separate post on them. Suffice it to say that the technical photo editing skills that have gone into this image are really very, very good.

Browsing through the work of Imagine Studio is like wafting through a dream that is both bold and sensual. That is why she has my Wednesday Heart.

Monday, October 19, 2009

Great Photographs - Afghan Girl by Steve McCurry


This is one of the most famous portraits ever taken. This 1984 photo was published in National Geographic in 1985 and Sharbat Guala became the human face of the Afghani refugees for the western world.

Steve McCurry is a photojournalist who makes his living through his evocative and tremendously brilliant images. Have you ever wanted to be a photojournalist but don't know where to start? Have you tried the method Steve McCurry used?

His career was launched when, disguised in native garb, he crossed the Packistan border into rebel-controlled Afghanstian just before the Russian invasion. When he emerged, he had rolls of film sewn into his clothes of images that would be published around the world as among the first to show the conflict there.

(NB - I don't actually recommend entering war zones in disguise unless you are really, really dedicated)

The image was shot on Kodachrome. I'd be lying if I pretended to understand the process, so I'll just give you a link to the Wikipedia page which you can peruse if you want to know more about the technical aspects.

In the end, Steve McCurry and National Geographic went back to find her and talk to her and see what had happened to her. After a long search, they found her and (with the permission of her husband, which is essential in that part of the world) re-photographed her. It's amazing the difference a lifetime can make.


If you'd like to buy a copy of the original image in poster size, please try Steve McCurry's website here.

Friday, October 16, 2009

Alien Cloning Pod

Okay, I made some changes to my purple alien cloning pod and listed it. Here's the finished version: